Microsoft Entra ID SAML
Learn how to configure a connection to Microsoft Entra ID via SAML.
Introduction
Each SSO Identity Provider requires specific information to create and configure a new connection. Often, the information required to create a connection will differ by Identity Provider.
To create a Entra ID SAML connection, you’ll need:
the ACS URL (provided by Daito)
a SP Entity ID (provided by Datio)
Admin-level access to your Entra ID tenant
the App Federation Metadata URL (can be found in your Entra ID tenant)
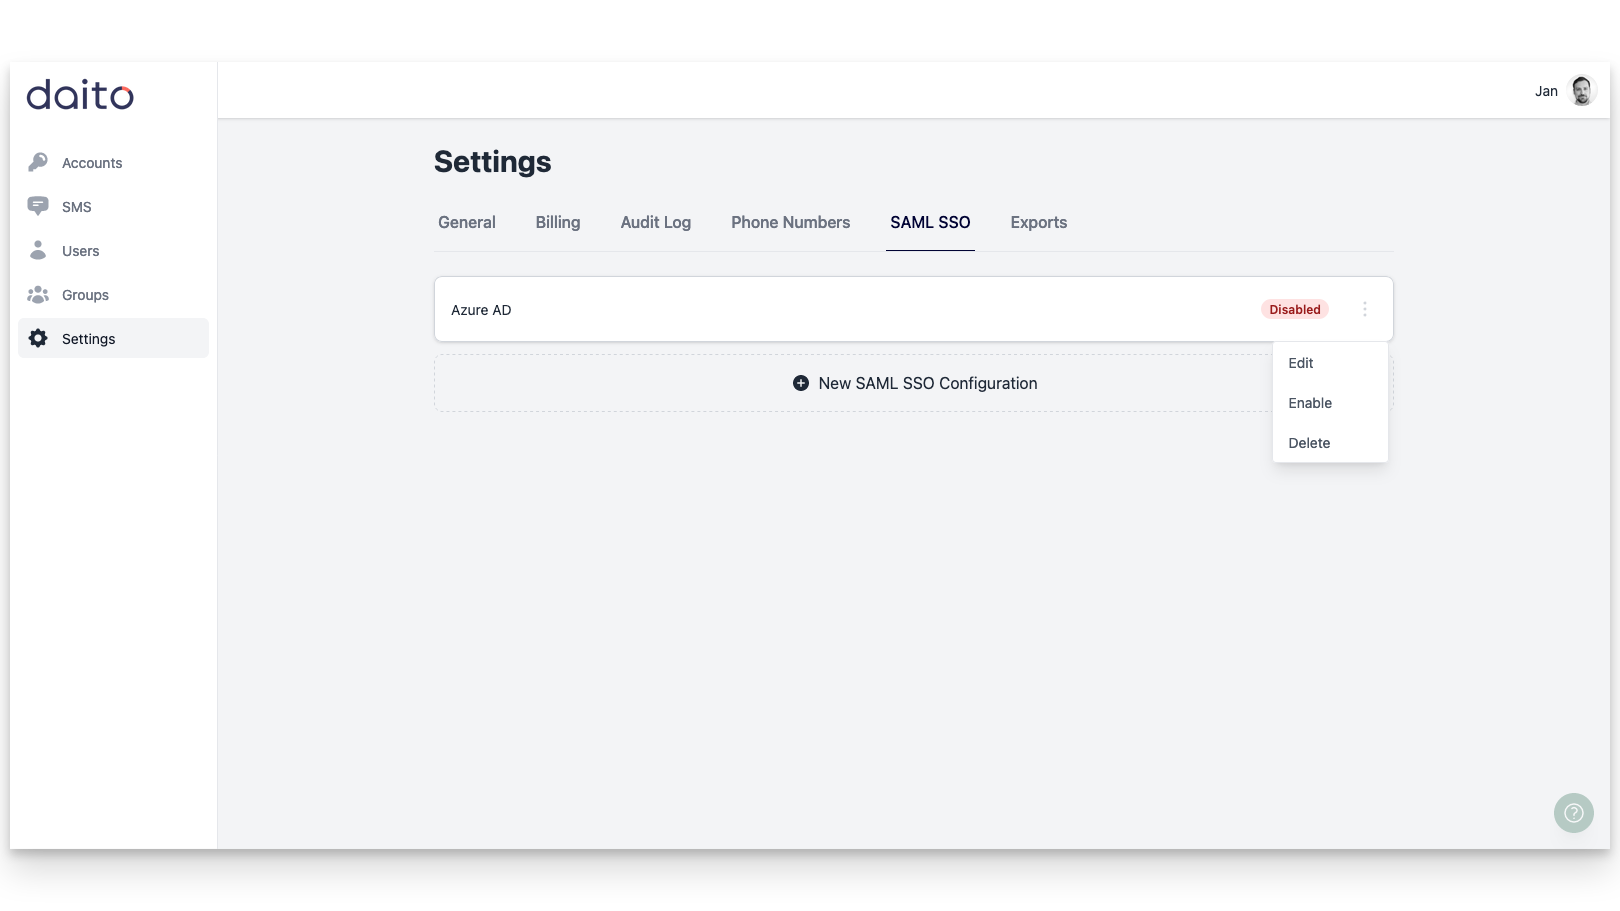
Start by logging into Daito and selecting “Settings”, then "SAML SSO" from the left hand navigation bar.
What Daito Provides
Daito provides the ACS URL and IdP URI (Entity ID). It’s readily available in your connection settings in the Daito settings.
The ACS URL is the location an Identity Provider redirects its authentication response to. In Entra ID’s case, it needs to be set by the organization when configuring your application in their Entra ID instance.
Specifically, the ACS URL will need to be set as the “Reply URL (Assertion Consumer Service URL)” in the “Basic SAML Configuration” step of the Entra ID “Set up Single Sign-On with SAML” wizard:
The Entity ID is a URI used to identify the issuer of a SAML request, response, or assertion. In this case, the entity ID is used to communicate that Daito will be the party performing SAML requests to the organization's Entra ID instance.
Specifically, the Entity ID will need to be set as the “Identifier (Entity ID)” in the “Basic SAML Configuration” step of the Entra ID “Set up Single Sign-On with SAML” wizard.
What you’ll need
In order to integrate you’ll need the Entra ID IdP Metadata URL.
Normally, this information will come from the organization's IT Management team when they set up your application’s SAML 2.0 configuration in their Azure admin dashboard. Here’s how to obtain them:
1) Log in
Log in to the Entra ID Admin dashboard . Select “Enterprise Applications” from the list of Azure services.

2) Select or create your application
Create a SAML Application in Azure by selecting “New Application”.

3) Initial SAML Application Setup
Select “Create your own application”, then enter a descriptive app name. Under “What are you looking to do with your application?”, select “Integrate any other application you don’t find in the gallery (Non-gallery)”, then select “Create”.
 Select “Single Sign-On” from the “Manage” section in the left sidebar navigation menu, and then “SAML”.

4) Configure SAML Application
Click the Edit icon in the top right corner of the first step "Basic SAML Configuration".
 Input the SP Entity ID from Daito as the “Identifier (Entity ID)”. Input the ACS URL from your Daito settings as the “Reply URL (Assertion Consumer Service URL)”.

5) Configure User Attributes and Claims
Click the Edit icon in the top right corner of the second step "Attributes & Claims".
Make sure the following attribute mapping is set:
Unique User Identifier (Name ID)→user.userprincipalnamehttp://schemas.xmlsoap.org/ws/2005/05/identity/claims/emailaddress→user.mailhttp://schemas.xmlsoap.org/ws/2005/05/identity/claims/givenname→user.givennamehttp://schemas.xmlsoap.org/ws/2005/05/identity/claims/name→user.userprincipalnamehttp://schemas.xmlsoap.org/ws/2005/05/identity/claims/surname→user.surname
These mappings translate the field names in your Azure AD tenant to the field names used in Daito.
If these are incorrectly configured you will get errors about "claims" or "attributes" not matching.

6) Add Users to SAML Application
In order for your users or groups of users to be authenticated, you will need to assign them to your Entra ID SAML application. Select “Users and groups” from the “Manage” section of the navigation menu.
 Select “Add user/group” from the top menu.
Select “None selected” under the “Users and Groups”. In the menu, select the users and groups of users that you want to add to the SAML application, and click “Select”.
Select “Assign” to add the selected users and groups of users to your SAML application.

7) Obtain Identity Provider Details
Select “Single Sign-On” from the “Manage” section in the left sidebar navigation menu.
Navigate down to Section 3 of the “Single Sign-On” page, to “SAML Signing Certificate”. Copy the url provided in “App Federation Metadata URL”.
 Next, in Daito within your SAML settings under "Idp Metadata URL" enter the Azure metadata URL.
 Now make sure to save by clicking "Save SAML SSO Configuration".
Enable your Entra ID SAML configuration
Your SAML configuration(s) will be disabled by default and need to be explicitly enabled. Make sure to do this after finishing the configuration.
Login to Daito via SAML SSO
With SAML SSO configured and enabled, perform the first login via SAML SSO. There are two options for this:
Go to https://app.daito.io/login and click on "Login with SSO", or
Go to https://.daito.io/sso and login
Then choose your account, login via your identity provider and you are in.